Programming a General Electric universal remote lets you consolidate control of multiple consumer electronics, such as TVs, DVDs, and set-top boxes, into a single remote. After setup, you can easily manage power, volume, channel, and other functions across all your devices.
You can program a GE remote in 2 ways: by inputting a programming code or by using the Code Search feature. With a programming code, you manually enter a 4-digit code compatible with your device, which you can find using our code lookup tool. With Code Search, the remote searches for codes automatically when you don’t have a code.
If you want to replace a TV remote at your home or you are a professional installer or technician seeking help with programming the remote for your clients, this article is for you. It guides you through detailed GE universal remote setup instructions for both methods, including steps to find the right code for programming.
Contents
- How to Program a General Electric Remote
- GE Universal Remote Codes List
- Frequently Asked Questions
- Do GE remotes work with Firestick and Roku?
- Can I control combo devices with GE remote?
- Do GE universal remotes support sub-channels?
- What are the ABCD buttons on GE Universal Remote?
- What if my TV brand is not in the code list?
- What if no codes work for my device?
- How do I program a GE remote without a Setup button?
- Why don’t the menu and navigation buttons work after programming?
- Can I use the original remote after programming GE remote?
- Do I need to reprogram the remote after changing batteries?
- How do I reset my GE remote to factory settings?
How to Program a General Electric Remote
You can program a GE universal remote using two methods. The first method, Direct Code Entry, involves manually entering codes for your device, which is quick and easy. The second method, Auto Code Search, lets the remote automatically scan for codes from its preprogrammed code library to find the right match for your specific device.
Let’s go through each method in detail.
How to Program GE Universal Remote with Code
The above-given are the quick steps to set up the remote if you have the right code handy. Now let’s see them in detail.
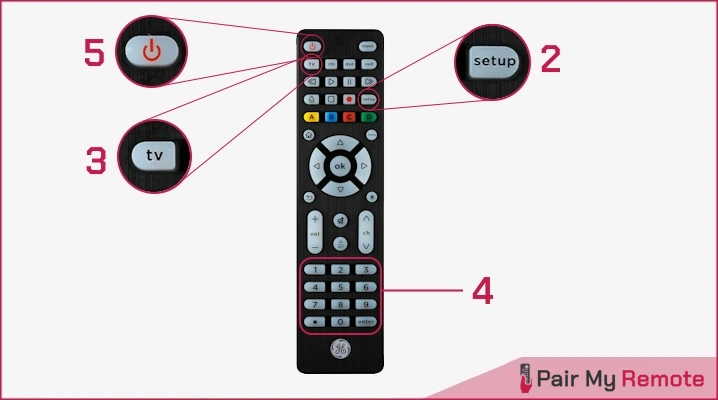
- Turn on the device you want to control (e.g., TV, DVD, etc.).
- Press and hold the Setup button until the red indicator light stays on.
- Press and release the device button (e.g., TV, DVD, SAT, etc.). The red light will blink once and stay on.
- Enter a 4-digit code (from the code table or code lookup tool provided below). The red light will turn off when the code is accepted. If it doesn’t work, try the next code.
- Test basic functions like Power, Volume, and Channel. If they work, you’re done. If not, try another code.
- Repeat steps 1-5 for each device you want to program.
- Depending on your remote, the indicator light is either a small red LED at the top or the illuminated “ON/OFF” button.
- Some older remotes have a “CODE SEARCH” button instead of “SETUP.” For programming the “AUX” mode on older remotes, press the “AUX” button, then the device button you want to assign.
- Any device button on the remote can be programmed to control a different device. For example, you can use the “DVD” button to operate a satellite receiver, streaming player, or digital converter box.
- For combination devices like TV/DVD or TV/VCR, you may need to enter a separate code for each device.
- If the listed codes for your brand don’t work or your brand isn’t listed, perform an auto code search.
- GE remotes have a maximum range of 30 feet. So your device should be within the range while programming or using the remote.
How to Program GE Universal Remote without Code
Here are the step-by-step instructions for setting up your GE remote using the auto code search method.
- Turn on your device (e.g., TV, DVD, SAT).
- Press and hold SETUP until the indicator light stays on, then release.
- Press and release the device button (e.g., TV, DVD). The indicator light will blink and stay on.
- Start the code search:
- For newer models: Press the POWER button. The remote sends batches of 10 codes. Wait until the device turns off. Repeat until the device turns off.
- For older models: Press the POWER (for TV) or PLAY (for DVD/VCR) button. The indicator light flashes every 2 seconds while searching.
- When the device turns off, turn it back on manually.
- Lock the code:
- For newer models: Press and release VOL+ to cycle through codes. Wait 3 seconds after each press. When the device turns off, press the device button again to store the code.
- For older models: When the device turns off or begins playing, press “1” to lock in the code. The indicator light will turn off.
- Test the remote: Check if the device responds to the power, volume, and channel buttons. If all work, you’re done. If not, repeat the search.
Notes:
- The VOL- button (on newer models) can be used to go backward through the batch of 10 codes if needed.
- The indicator light will flash twice after testing the first or last code in each batch.
- Combination devices (e.g., TV/DVD or TV/VCR) require a separate code for each device.
Now that the remote is programmed automatically, do you know the code used? Well, there is a simple process to find it. Follow the code identification steps to retrieve the code and keep it handy for future reference.
Code Identification
The code identification process helps you find the compatible code stored in your remote after successfully programming it with the Auto Code Search method.
To identify the code, follow the steps below:
- Hold the SETUP button until the indicator light turns on, then release it.
- Press and release the device button (e.g., TV, DVD, SAT) for the device you want to identify the code for. The light will blink and stay on.
- Retrieve the code digits:
- For newer models: Press ENTER, then press “1“, “2“, “3“, and “4” to get each digit. The indicator will flash the corresponding number of times for each digit.
- For older models: Press each number (0-9). The number that causes the indicator to blink is the code digit. Repeat for all four digits. After the fourth, the light will turn off.
- Press “ENTER” to exit.
GE Universal Remote Codes List
GE universal remote codes, also known as device codes or manufacturer codes, are device-specific numeric sequences used by the remote to establish communication and control functions with compatible electronic devices, such as televisions.
All recent GE universal remotes use 4-digit codes, while older models use 3-digit codes. Over the years, GE has released several code list versions, specifically V1 (2006), V2 (2011), V3, V4 (2012), V5, CL3 (2013), CL4 (2016), CL5 (2019), and CL6 (2022 onwards). Each version enhances compatibility by adding support for more devices and brands, ensuring improved functionality and user experience.
The table below lists the latest 4-digit programmable GE remote codes for popular TV brands.
| Brands | Programming Codes |
|---|---|
| Vizio TV | 5631, 5611, 5561, 6471, 6511, 6121 |
| LG TV | 6021, 5511, 6171, 0001, 3001, 1911, 1181 |
| Samsung TV | 5791, 5801, 3301, 3321, 2961 |
| Philips TV | 6221, 0181, 6241, 6171, 5741, 6261, 6051 |
| Sanyo TV | 1161, 5261, 6171, 2891, 5251, 1741 |
| Dynex TV | 3141, 5311, 3161, 6521, 0371, 2891 |
| Sony TV | 1071, 5811, 5321, 4981, 1901, 2741 |
| Element TV | 5421, 1091, 6171, 1651, 5361 |
| Magnavox TV | 5741, 4191, 6171, 4761, 0975 |
| Emerson TV | 2761, 5761, 5231, 5221, 5831, 5561 |
| Insignia TV | 2891, 0371, 6381, 6091, 6171 |
| Hisense TV | 6161, 1651, 6251, 6171, 2081, 5331 |
*The above given GE remote control codes are compiled from General Electric’s (Jasco) official code lists.
GE offers a range of remote models, including ones that can control up to 8 devices, such as the UltraPro 8-device backlit universal remote. So you may want to pair your remote with other devices as well. To find codes for additional TV brands and over 15 other devices, such as DVD players, soundbars, and Blu-ray players, use the code lookup tool below.
GE Remote Code Lookup Tool
Code Version
Device Type
Brand
How to Find the Right Code?
Below are the steps to find the right code for your particular device using our code lookup tool.
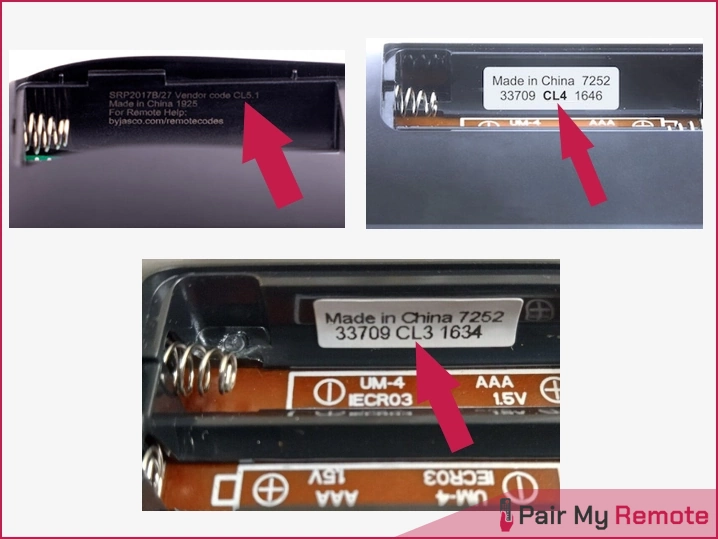
Step 1: Identify Your Remote’s Code List Version
To find the right code, first identify your remote’s Code List version. Open the battery compartment and look for a white sticker under the batteries or on the cover. Here’s how to identify your version:
- V1: “V1” or no version number after the model number.
- V2-V5: Look for “V2” to “V5” after the model number.
- CL3, CL4, CL5, CL6: Newer remotes will have these labels.
Step 2: Use the Code Lookup Tool
Once you’ve identified your version, use the code lookup tool to quickly find the correct code for your device.
Step 3: Try Multiple Codes
If the first code doesn’t work, try another one from the list. Some codes may only offer basic functions (like volume or channel control), but keep trying until you find one that unlocks full functionality.
Programming a GE universal remote with your devices may seem difficult, but with our easy-to-follow instructions and the comprehensive list of universal remote control codes, you can easily connect all your devices with a single remote in no time. Start with the direct code entry method for quick programming, and if that does not work, switch to the code search method. Once you program the remote successfully, take a moment to identify the code for each device and note it down for future reference.
Frequently Asked Questions
Questions frequently asked to our experts about GE remote compatibility, device codes, programming, and troubleshooting are answered below.
Do GE remotes work with Firestick and Roku?
No, GE, Philips, and UltraPro universal remotes with STR or STRM buttons do not work with RF-based devices like the Roku Streaming Stick or Amazon Firestick. However, they are pre-programmed to control IR-based streaming devices such as Roku media boxes.
Can I control combo devices with GE remote?
Yes, you can control combo devices like TV/DVD or TV/VCR, but you will need to program the remote separately for each function. For example, you can set up one code to control the TV and another to control the DVD player.
Do GE universal remotes support sub-channels?
Yes, most GE universal remotes, including the 4-device, 6-device, and 8-device models, have a dedicated "dot (•)" or "dash (-)" button for easy access to sub-channels (digital channels), such as 5.2 or 6.1, which are commonly found on DVRs and set-top boxes.
The multi-colored ABCD buttons are non-programmable buttons that perform different functions depending on the device being controlled. On GE, Philips, and UltraPro remotes, they are typically used for advanced DVR functions or for operating a cable or satellite set-top box. Their functionality depends on the DVR or set-top box programmed to your remote.
What if my TV brand is not in the code list?
If your TV brand is not listed, try using the auto-program method. This method will scan all codes in the remote's memory until it finds the correct one for your TV.
What if no codes work for my device?
If none of the listed codes work, first check if your device is compatible with the remote. If it is, use the auto-programming feature, which scans all the codes in the remote's memory to find the correct one.
To program a GE remote without a "Setup" button, use the "Code Search" button instead — the rest of the steps remain the same.
The issue may be due to the remote using shift mode. To fix this, press and release the shift/setup button, then use the arrow buttons while the red light blinks. If this doesn't work or your remote lacks a shift function, try reprogramming the remote with a different device code. For more details on shift mode, refer to the GE instruction manual for your specific model.
Can I use the original remote after programming GE remote?
Yes, you can still use the original remote along with your GE remote. Programming a device into the universal remote does not affect the functionality of the device's original remote.
Do I need to reprogram the remote after changing batteries?
No, you don't need to reprogram your GE remote after swapping batteries. The built-in code saver retains the programmed codes for up to 10 minutes, giving you enough time to replace the batteries.
How do I reset my GE remote to factory settings?
To reset your remote, press and hold the Setup button until the light turns on. Then, press the mute button and then press 0 (zero). This will restore your remote to its factory settings, ensuring it works smoothly.