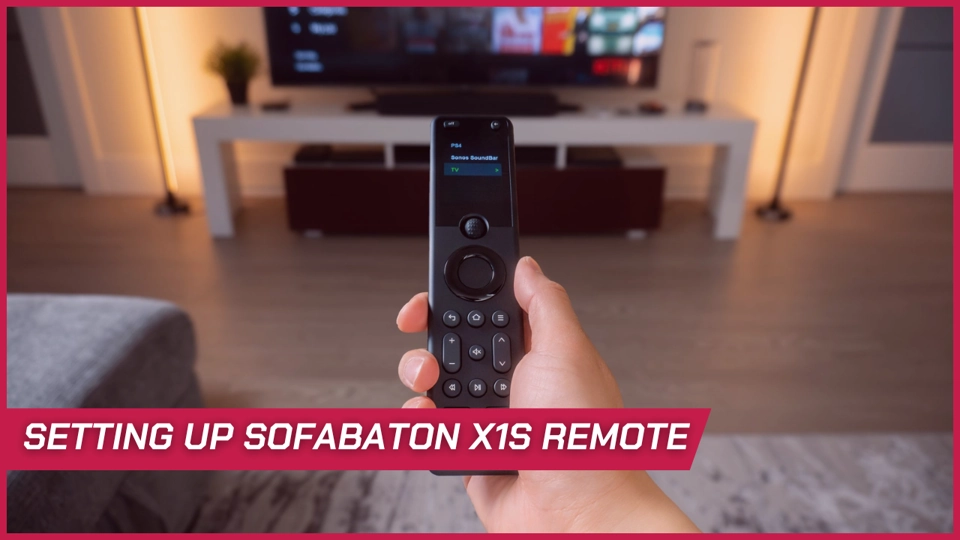
The SofaBaton X1S is a smart universal remote designed to simplify your home entertainment setup. With support for multiple devices, an intuitive app, and seamless customization, it replaces multiple remotes with a single, user-friendly gadget.
To set up your Sofabaton X1S universal remote, download the Sofabaton app, register an account, connect the hub to your Wi-Fi, add your devices, complete the power settings and source configuration, and then create activities for different home theater scenarios.
Here’s a more detailed breakdown:
Contents
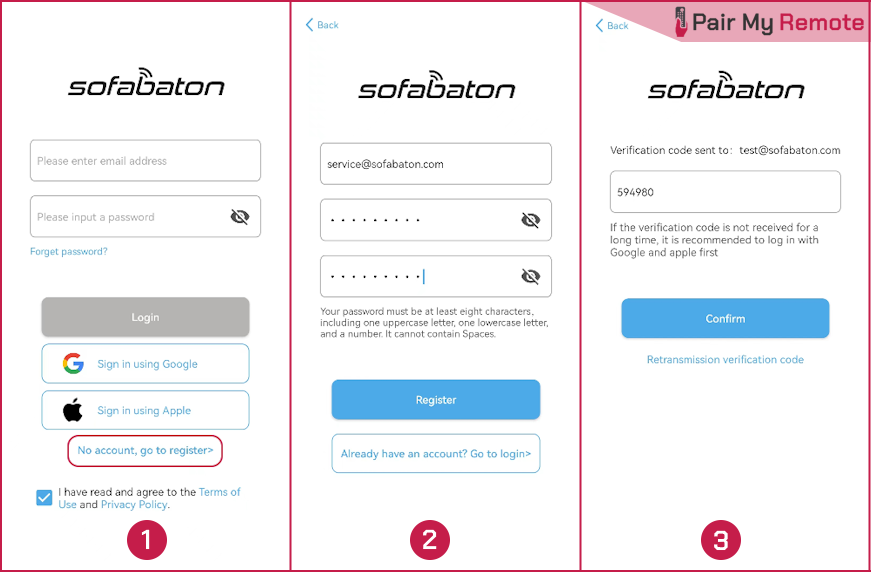
Step 1: Download Sofabaton App and Register an Account
- Turn on Bluetooth and Wi-Fi on your smartphone.
- Download and install the Sofabaton app from the Play Store or App Store.
- Register an account on the app as in the screenshots below. If you already have an account, log in directly.
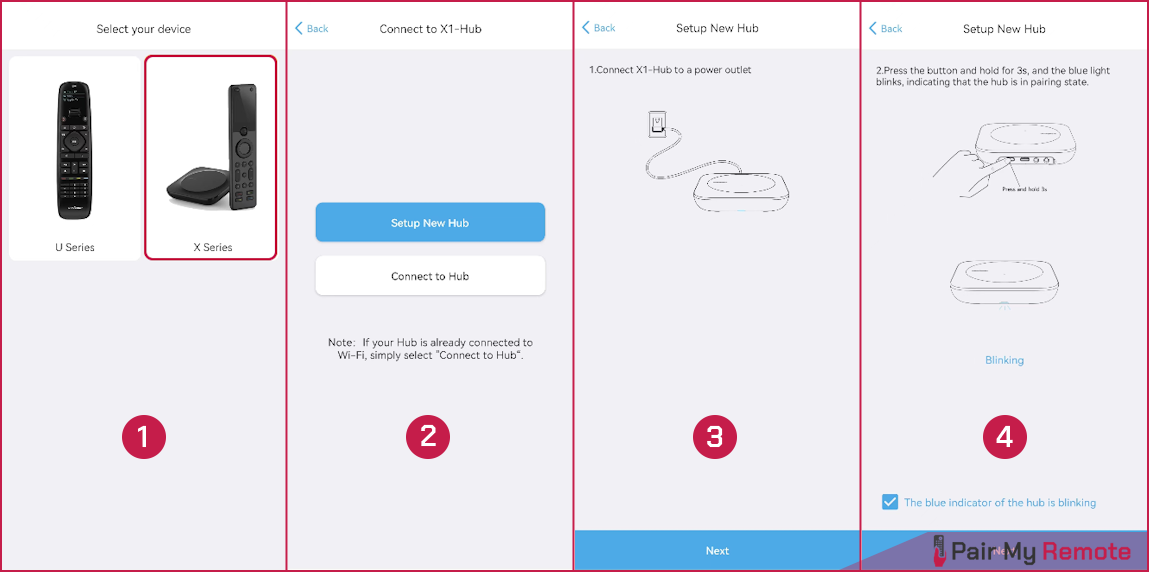
Step 2: Connect the Hub to Your Home Wi-Fi
- Launch the Sofabaton app and select “X-Series”.
- Tap on the “Setup New Hub” option on the next screen.
- Follow the on-screen instructions to ensure the hub is properly connected.
- Press and hold the power button for three seconds until the blue indicator light flashes. The hub is now in pairing mode and you can proceed to the next step.
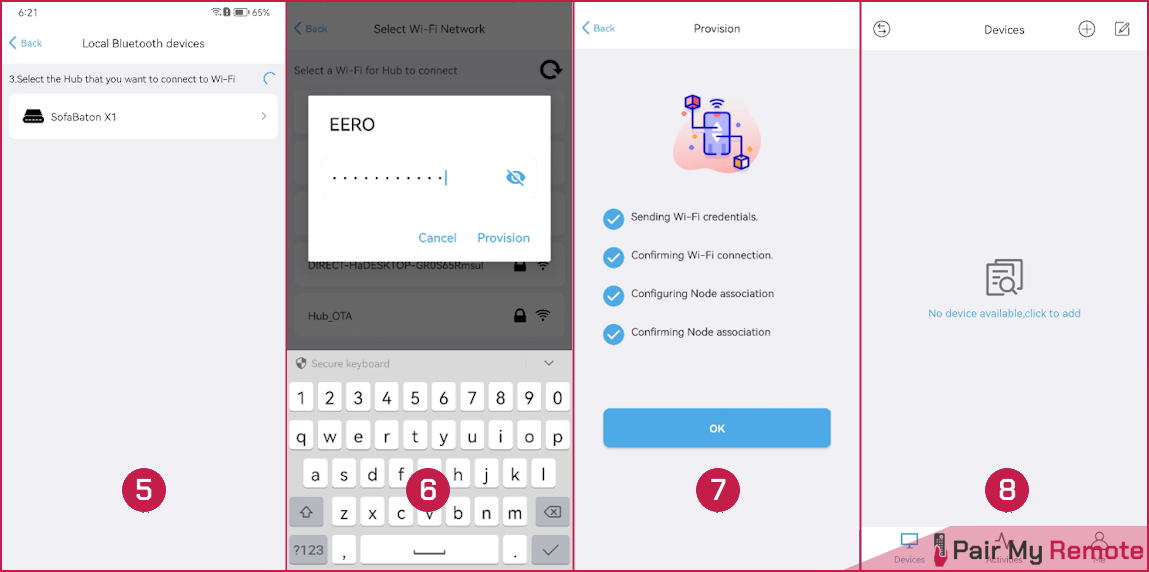
- The app will now detect the hub. You will need to enable the “Allow Bluetooth for new devices” in your phone settings if you are using an iOS device.
- Select the Wi-Fi network you want to connect to.
- Once you enter the password and verify it, the hub should be connected to the Wi-Fi network.
- The app will automatically connect to the hub and open the Devices page.
Step 3: Add Your Devices
Once the hub is connected and you are on the Devices page on the app, follow the steps below to add your devices.
- Tap the “⊕” icon at the top right corner of the screen to add a device.
- Choose the type of device you want to add (Infrared Control, Bluetooth, and Wi-Fi).
- Follow the on-screen instructions to complete the settings.
Below is how to add specific device types.
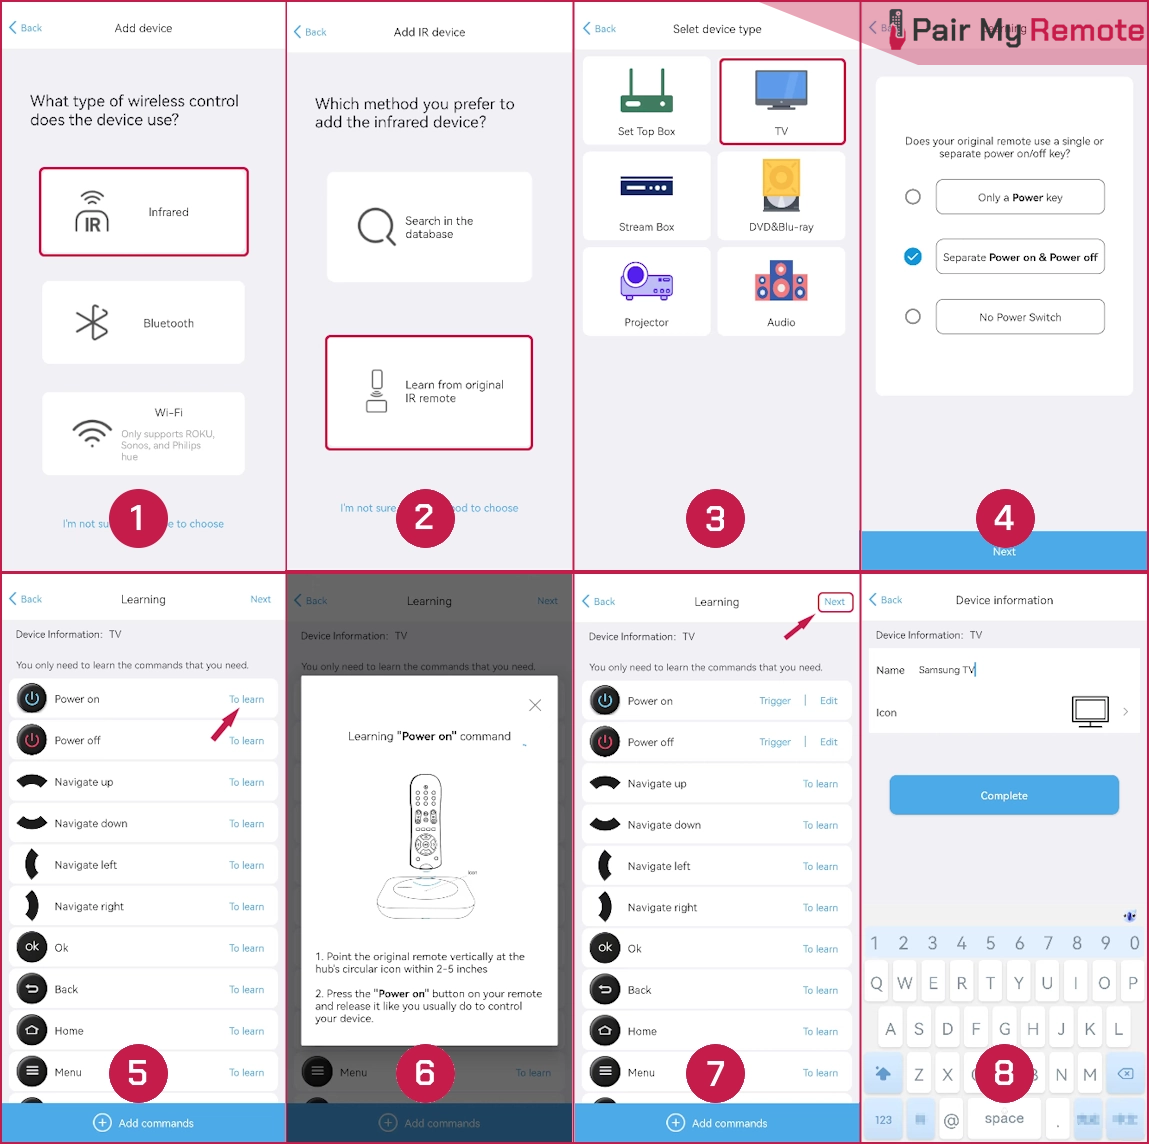
1. Add an Infrared Device
You can add an infrared device to the app in three ways: by learning from the original device remote, searching in the database, or by IR matching.
If you want a couple of commands for daily use, it’s better to learn these commands directly from the original remote. Otherwise, perform a search in the database to download the code library. If your model is not listed in the code library, you can test the commands to match the correct code library.
Learn from Original Remote
To learn infrared commands from the original remote, on the Add device page, go to Infrared > Learn from original IR remote > select device type. Then follow the on-screen prompts to learn the desired functions. Once learning is done, name the device and tap “Complete”. If the learning is unsuccessful, go back to the previous menu and enter the learning mode again to repeat the process. But this time, make sure to follow the IR learning best practices as we explained. Here are the screenshots of learning from the original IR remote.
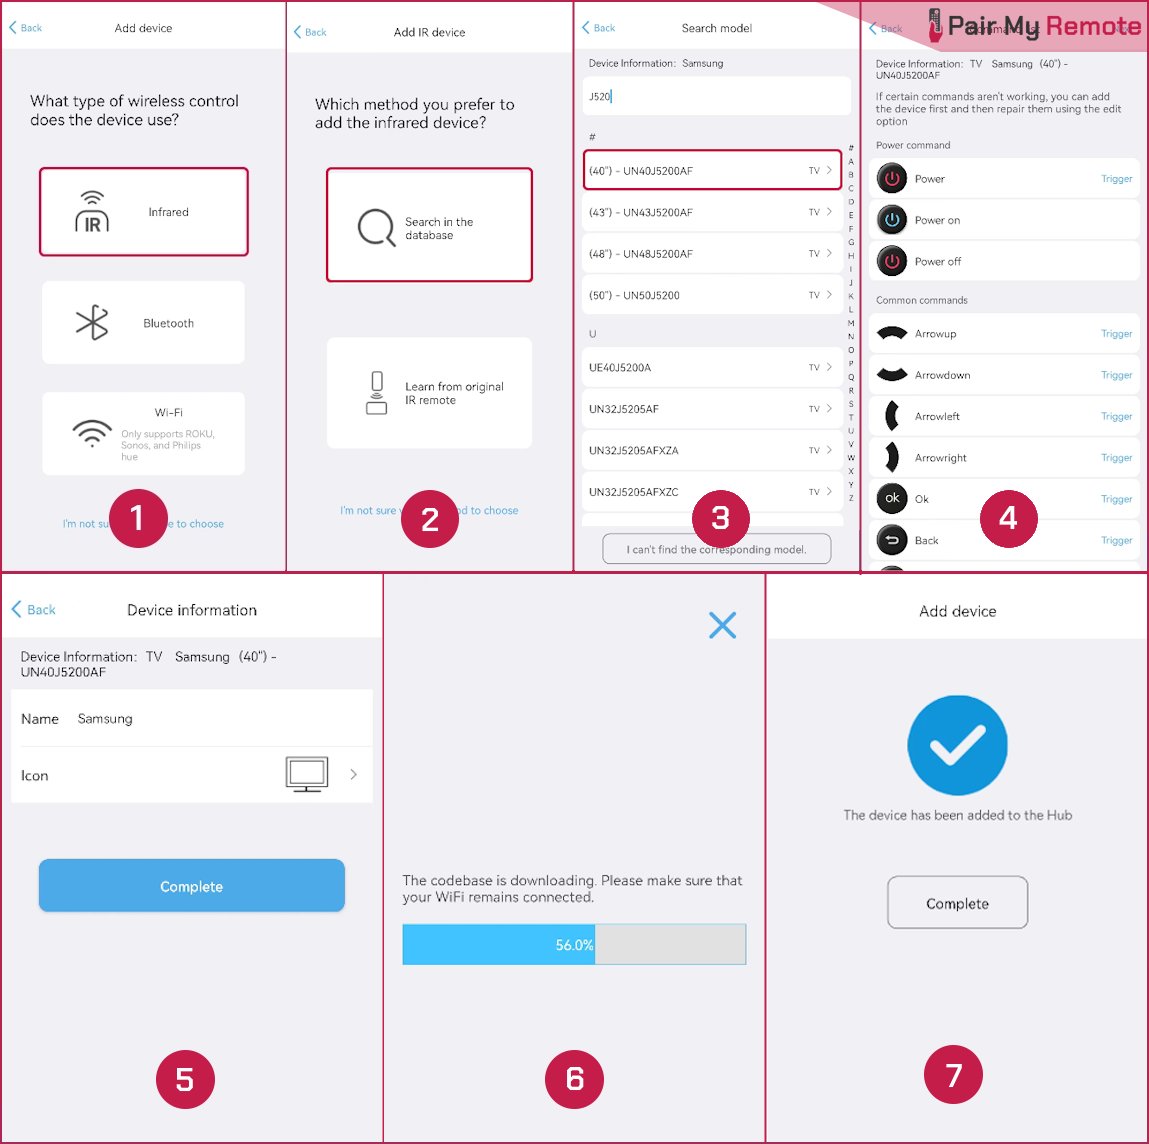
Search in the Database
With this method, you can add a device by its exact brand and model. If there is no exact match, you can add a device with a similar model or select and download a universal codebase from the same series. Here are the screenshots of performing a search in the database.
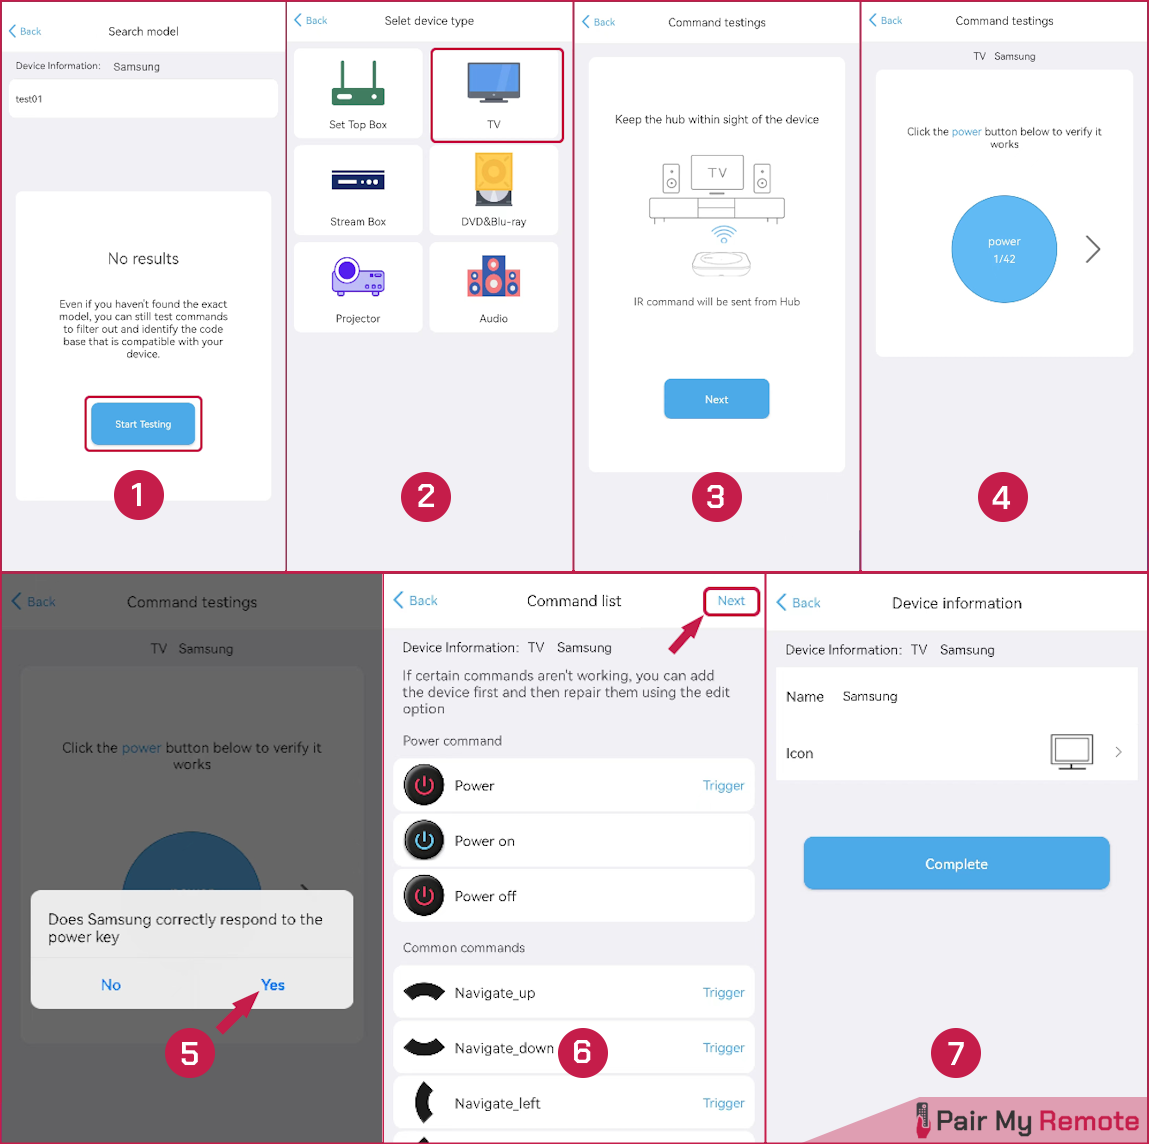
Test Commands by IR Matching
If you fail to add a device using the above two methods, you can test a few commands to find a working code library by performing the IR matching method. For this tap “I can’t find the corresponding model” after searching your device brand.
2. Add a Bluetooth Device
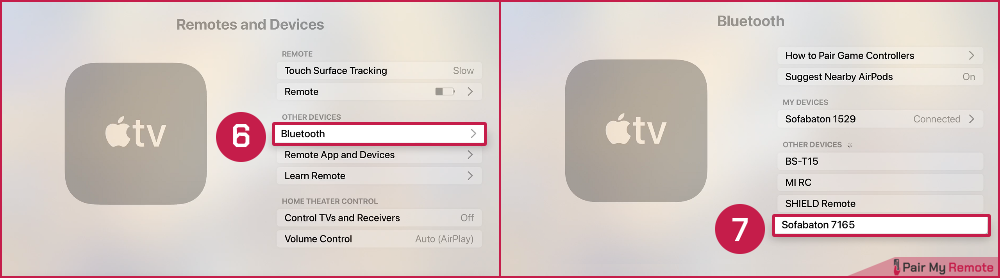
To show how to add a Bluetooth device, we are using Apple TV as an example. Here are the steps to follow:
- In the Add Device page, select Bluetooth > Apple > Complete. The codebase will now download. Once done, it will wait for a Bluetooth device to connect.
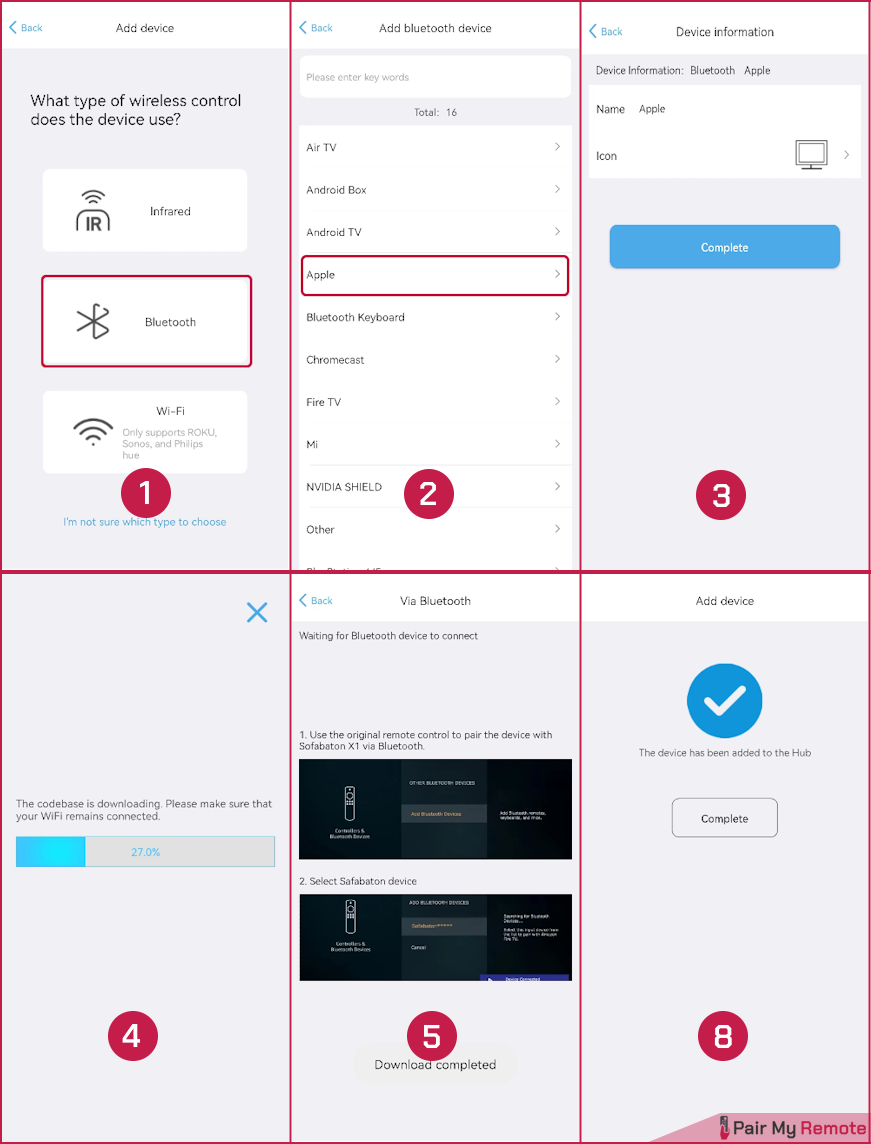
- On your Apple TV, navigate to Settings > Remotes and Devices > Bluetooth, and then select the device starting with “Sofabaton” to pair. Once done, you will be notified in the app about the device addition.
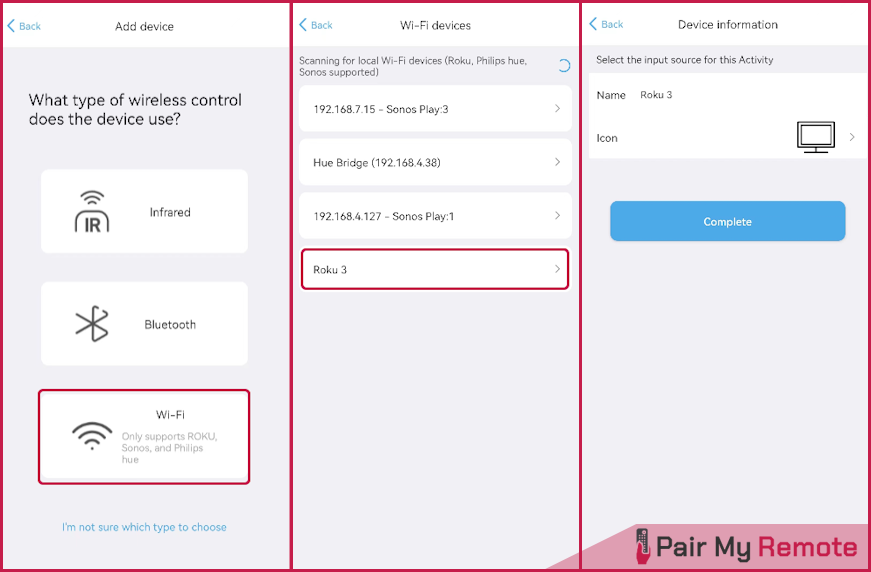
3. Add a Wi-Fi Device
Sofabaton X1S currently supports devices like Roku, Philips Hue, and Sonos only. To add such a Wi-Fi device, follow these instructions.
- In the Add Device page, select Wi-Fi. The app will now automatically scan for devices that can be connected to the same Wi-Fi network.
- Select the device you want to add and follow the on-screen instructions.
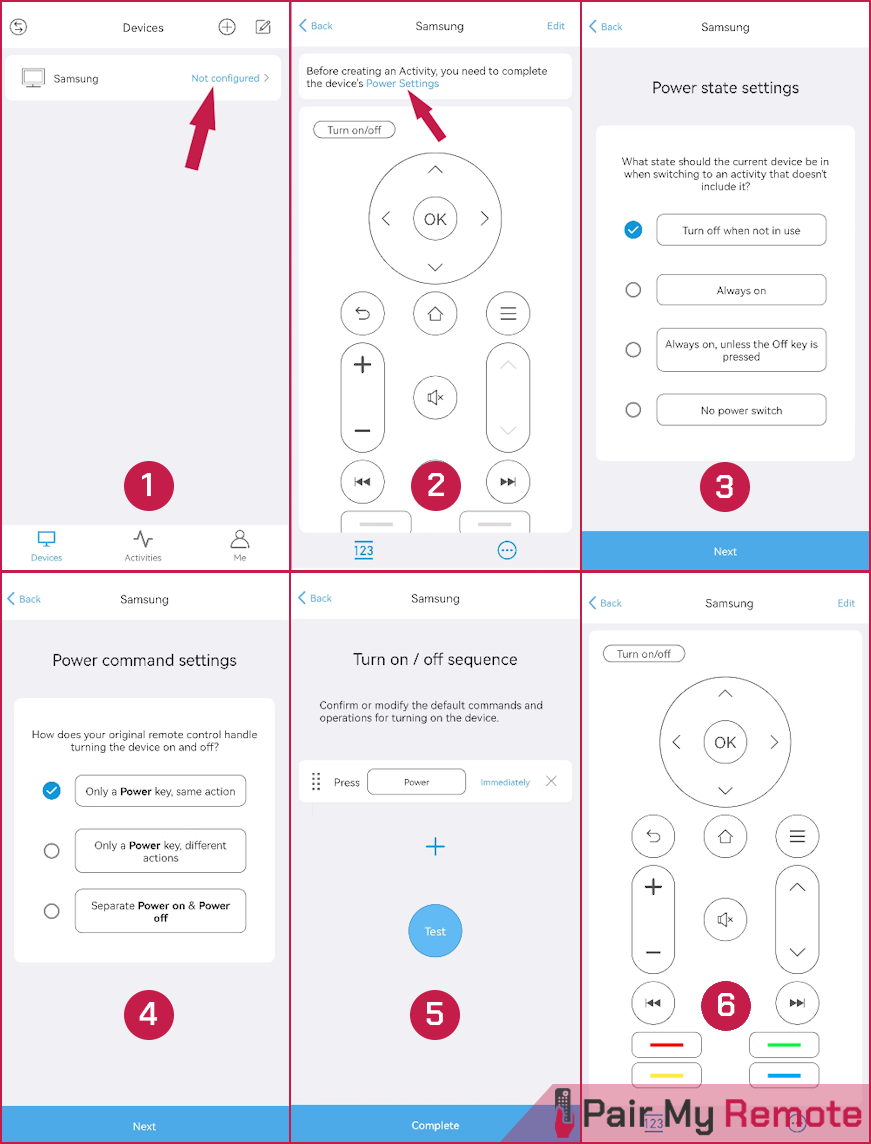
Step 4: Complete Power State Settings
Completing the power state settings for your devices helps you properly control the devices on and off when switching between activities. Follow the steps below to do it.
- On the Devices page, tap the “Not configured” tag for the device you want to complete power settings.
- Tap on “Power Settings” in the message at the top of the screen.
- Follow the on-screen prompts. You will need to check the desired power state setting for your device.
- If your device lacks a power button, the default setting is “No power button.” If it has one, the default is “Turn off when not in use,” meaning the X1S Hub will automatically turn it off when you switch to an activity that doesn’t require it.
- Ensure the default power command matches your original remote. The system may have options like “Power Toggle,” “Power On”, and “Power Off”. You can change the default when switching activities.
- Press the “Test” button to check if the default power command works correctly.
- If your device needs a long press or a combination of commands to power on/off, adjust the settings first. Once it works properly, confirm completion.
- Note: If your TV switches inputs but starts up slowly, you can add a delay after the power-on command. This ensures the system waits for the TV to fully start before switching inputs to ensure commands are not missed.
- Once completing the power settings, you’ll be redirected to the Devices page, and the Power Settings tab will no longer be visible.
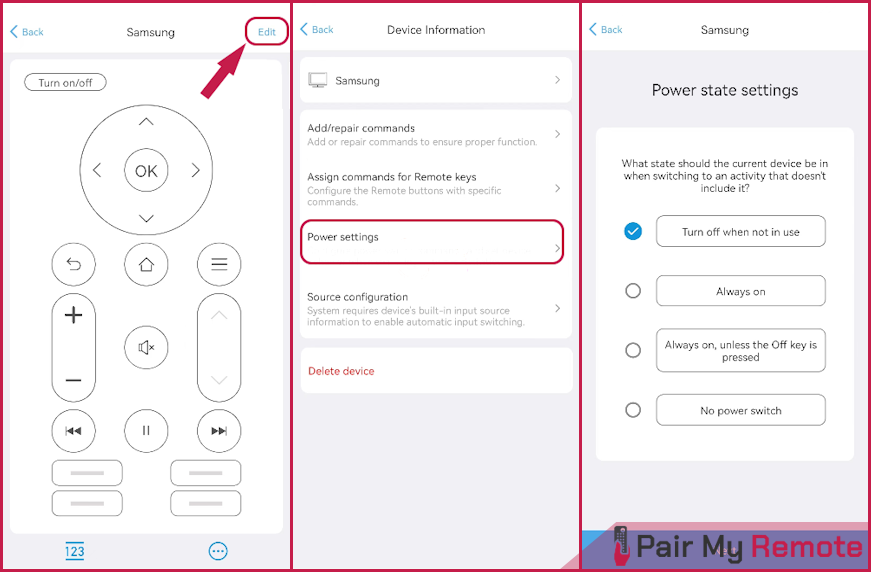
To modify the Power Settings later, click the “Edit” button and select the “Power Settings” option. You can then adjust the settings as required by following the same steps as before.
Step 5: Set up Source Configuration
Setting up the source configuration ensures that your device seamlessly switches to the correct input when you switch activities. This functionality is particularly helpful for setups with multiple input sources, such as televisions, projectors, or AV receivers, where switching between HDMI ports, component inputs, or other connections can become difficult. Here’s how to set up the source configuration:
- On the Devices page, tap the “Not configured” tag for the device you want to configure the source settings.
- Tap on “Source Configuration” in the message at the top of the screen. If there is no direct link in the message, tap “Edit” and then choose from the options.
- In the settings, first, verify if you need to switch inputs. Select your desired option and tap “Go to configure“.
- Next, choose how you want to switch input sources. You have three options – direct input switching, bring up the navigation menu, and input toggling/ cycling. Configure the further settings in the option you selected and confirm it.
Step 6: Create Activities
Once you have added your devices and set up power and source configurations, you can create activities based on specific home theater scenarios. Below are the steps to create an activity.
- Launch the app and navigate to the Activities page.
- Press the “⊕” icon at the top right corner of the screen to create a new activity.
- Follow the on-screen instructions to select the devices you want to control and input for the activity.
- Assign remote buttons to control different devices.
- Select the device you want the volume and other additional keys to control.
- To reassign commands, edit the activity, select Assign Commands for Remote Keys, and customize the functions to your preference.
- Type in the name of the activity and save it.
- To further customize an activity, tap on “Edit”, select “Startup Settings”, and add a step, command, or delay. (For example, if your TV takes time to turn on, you can insert a delay between powering it on and switching inputs for smoother transitions).
And that is how you set up your SofaBaton X1S Universal Remote! We have included helpful screenshots to make the process easier, but if you have any questions or run into any issues, feel free to ask in the comments.